As enterprises mature in their appreciation and use of AI, machine learning, and deep learning, a critical question arises: How can they scale and industrialize ML development? Many conversations around machine learning focus on the actual model, however, this is only one step along the way to a complete solution. To achieve actual application and scale in production, models must be developed within a repeatable process that accounts for the critical activities that precede and follow model development including finally getting it into a public facing deployment.
This post demonstrates how to deploy, scale, and manage a Deep Learning Model that serves up image recognition predictions using Kubermatic Kubernetes Platform.
Kubermatic Kubernetes Platform is a production grade open-source Kubernetes cluster management tool that offers flexibility and automation to integrate with your ML/DL workflows with full cluster lifecycle management.
Let’s get to it!
1. Making The Model Accessible Using Flask Server
We are deploying a Deep Learning model for image recognition. We used the CIFAR10 dataset that consists of 60000 32x32 colour images in 10 classes with the Gluon library in APACHE MXnet and NVIDIA GPUs to accelerate the workload. If you would like to use a pretrained model on CIFAR10 dataset check out this link.
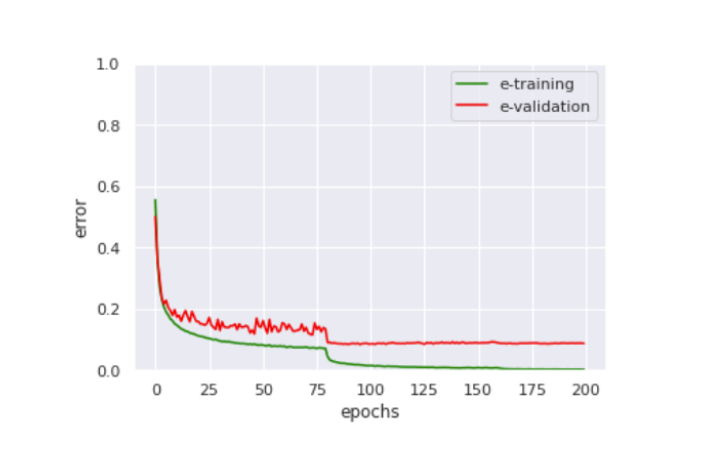
We trained the model over a span of 200 epochs, as long as the validation error kept decreasing slowly without causing the model to overfit. We can better observe the training process though this plot :
One important step after training is to save the model’s parameters so that we can load them later.
file_name = "net.params"
net.save_parameters(file_name)
Once the model is ready, the next step is to wrap your prediction code in a Flask server. This allows the server to accept an image as an argument to its request and return the model’s prediction in the response.
from gluoncv.model_zoo import get_model
import matplotlib.pyplot as plt
from mxnet import gluon, nd, image
from mxnet.gluon.data.vision import transforms
from gluoncv import utils
from PIL import Image
import io
import flask
app = flask.Flask(__name__)

@app.route("/predict",methods=["POST"])
def predict():
    if flask.request.method == "POST":
        if flask.request.files.get("img"):
            img = Image.open(io.BytesIO(flask.request.files["img"].read()))
            transform_fn = transforms.Compose([
            transforms.Resize(32),
            transforms.CenterCrop(32),
            transforms.ToTensor(),
            transforms.Normalize([0.4914, 0.4822, 0.4465], [0.2023, 0.1994, 0.2010])])
            img = transform_fn(nd.array(img))
            net = get_model('cifar_resnet20_v1', classes=10)
            net.load_parameters('net.params')
            pred = net(img.expand_dims(axis=0))
            class_names = ['airplane', 'automobile', 'bird', 'cat', 'deer',
                       'dog', 'frog', 'horse', 'ship', 'truck']
            ind = nd.argmax(pred, axis=1).astype('int')
            prediction = 'The input picture is classified as [%s], with probability %.3f.'%
                         (class_names[ind.asscalar()], nd.softmax(pred)[0][ind].asscalar())
    return prediction

if __name__ == '__main__':
    app.run(host='0.0.0.0')
2. Dockerizing the Model:
In order to deploy our model to Kubernetes, we first need to create a container image with our model. In this section, we will install Docker and create a container image of our model.
Here are the steps to follow :
- First, download, install, then start Docker
sudo yum install -y yum-utils device-mapper-persistent-data lvm2
sudo yum-config-manager --add-repo https://download.docker.com/linux/centos/docker-ce.repo
sudo yum install docker-ce
sudo systemctl start docker
- Now let’s create a directory where we can organize our code and dependencies
mkdir kubermatic-dl
cd kubermatic-dl
- The next step is to create
requirements.txtfile that will contain the packages that the code needs to run
flask
gluoncv
matplotlib
mxnet
requests
Pillow
- Then we create the Dockerfile. This is the file that Docker will read to build and run the model
FROM python:3.6
WORKDIR /app
COPY requirements.txt /app
RUN pip install -r ./requirements.txt
COPY app.py /app
CMD ["python", "app.py"]
We can break this Dockerfile down into three steps. First, creating the Dockerfile will instruct Docker to download a base image of Python 3. Once completed, we ask Docker to use the Python package manager pip to install the packages detailed in requirements.txt. Finally, we tell Docker to run our script via python app.py.
- Once done, we build the Docker container
sudo docker build -t kubermatic-dl:latest .
This instructs Docker to build a container for the code located in our current working directory kubermatic-dl.
- Now that our container is built, we can check that it is working by running the container on our local machine
sudo docker run -d -p 5000:5000 kubermatic-dl
- You can check the status of your container by running
sudo docker ps -a

3. Upload the Model to Docker Hub:
Before we can deploy the model on Kubernetes, we first need to make it publicly available. We will do this by adding it to DockerHub.
You will need to create a Docker Hub account if you don’t already have one.
- Login to your Docker Hub account
sudo docker login
- Tagging the image is a way of referring to the image for versioning when we upload it to Docker Hub
sudo docker tag <your image id> <your docker hub id>/<app name>

sudo docker push <your docker hub name>/<app-name>

To check your image id, you simply run sudo docker images
4. Deploy the Model to a Kubernetes Cluster Using Kubermatic Kubernetes Platform:
First, we need to create a project on the Kubermatic Kubernetes Platform, then we create a Kubernetes cluster. You can find a quick start tutorial here.
Once the cluster is created, download the kubeconfig that is used to configure access to your cluster, change it into the download directory, and export it into your environment.
- Using
kubectl, check the cluster information such as the services which are started on your cluster bykube-system:
kubectl cluster-info

- Next, to run the container in the cluster, we need to create a deployment (
deployment.yaml) and apply it to the cluster.
apiVersion: apps/v1
kind: Deployment
metadata:
  name: kubermatic-dl-deployment
spec:
  selector:
    matchLabels:
      app: kubermatic-dl
  replicas: 3
  template:
    metadata:
      labels:
        app: kubermatic-dl
    spec:
     containers:
     - name: kubermatic-dl
       image: kubermatic00/kubermatic-dl:latest
       imagePullPolicy: Always
       ports:
       - containerPort: 8080
kubectl apply -f deployment.yaml
- To expose our deployment to the outside world, we need a service object that will create an externally reachable IP for our container.
kubectl expose deployment kubermatic-dl-deployment --type=LoadBalancer --port 80 --target-port 5000
- We’re almost there! We finally need to check our services in order to determine the status of our deployment and get the IP to call our image recognition API
kubectl get service

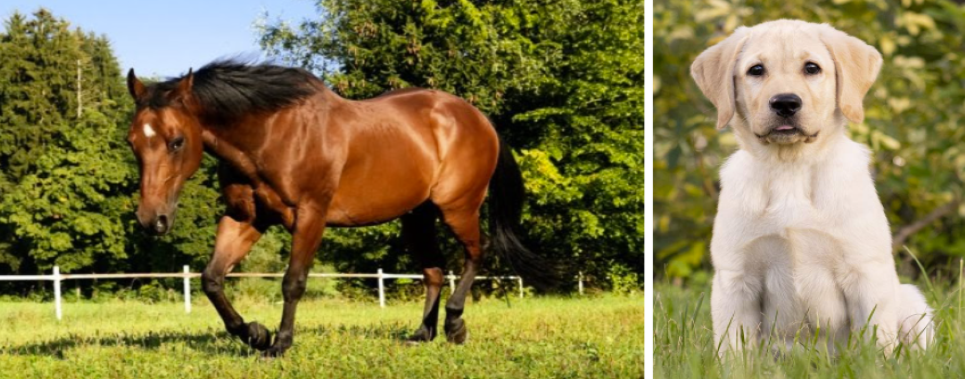
- To test our API we can use these two images using the external-ip

It’s Aliiiiive!
Summary
In this tutorial, we created a deep learning model to be served as a REST API using Flask. We then put the application inside of a Docker container, uploaded the container to Docker Hub, and deployed it with Kubernetes. With just a few commands Kubermatic Kubernetes Platform deployed our app and exposed it to the world.