


In this guide, we will discuss how to expose an application to the outside world via Services. We will cover five different types of Services and their usage. Basic knowledge of Pod and Deployment is suggested to follow the hands-on practice on this part of the series.
Services in Kubernetes
A Kubernetes Service is a Kubernetes object which enables cross-communication between different components within and outside a Kubernetes cluster. It exposes Kubernetes applications to the outside world while simultaneously allowing network access to a set of Pods within and outside of a Kubernetes cluster.
Creating a Service
You can create a Service just like any of the Kubernetes objects we have made before, by creating a YAML manifest file, but with the kind value set to “Service.”
apiVersion: v1
kind: Service
metadata:
  name: ## name of the Service
spec:
 selector:
  app: ## Serves as a label which should be refrenced in a Pod / Deployment manifest file
  department: ##same as above
 ports:
 - protocol:  ##The default is TCP
   port: ##Exposes the service within the cluster. Also, other Pods use this to access the Service
   targetPort: ##The service sends request while containers accept traffic on this port.
The above manifest represents a Service configuration template without specifying the Service type.
Question: Why can’t I use the Pod’s external IP instead of a Service as mentioned in part three of this series?
Why Services and Not Pod IP?
The Pod IP address is dynamic, which means it could change any moment. For example, when a Pod crashes or is deleted and another one comes up with the help of a ReplicaSet, the new Pod has a different IP address from the terminated one. This makes the Pod IP address unstable which can result in application errors. However, managing a connection to a Pod with a Service creates a stable IP address to reach the Pod at.
Service Types
There are five different types of Service:
- ClusterIP (default)
- Node Port
- ExternalName
- Headless
- Load balancer
ClusterIP
This is the default Service type. It establishes a connection between different Services and applications using an internal cluster virtual IP. This type of Service is only reachable within the cluster.
Creating a Service with ClusterIP
To start these exercises, you need to have a running Kubernetes cluster. You can easily create a Kubernetes cluster on any environment with KubeOne. Check the Getting Started guide for instructions. Alternatively, you can simply use the Kubernetes playground for practising purposes.
Step 1: First, create a Deployment and make sure that the spec.selector.matchLabels.app value in the Deployment manifest file matches the spec.template.metadata.labels.app value in the same Deployment manifest as well as the spec.selector.app value in the Service manifest file. The manifest file will look like this:
apiVersion: apps/v1
kind: Deployment
metadata:
 name: my-deployment
spec:
 replicas: 2
 strategy:
  type: Recreate
 selector:
  matchLabels:
   app: my-app
 template:
   metadata:
    labels:
     app: my-app
     env: prod
   spec:
    containers:
    - name: my-deployment-container
      image: nginx
Use kubectl create command to create the Deployment. This configuration will create a Deployment with two Pods that we will expose with a ClusterIP service. Once the Pods are running by checking it using kubectl get pods command, create a Service with the below configuration:
Step 2: Create the Service
Create a YAML file:
$ vim clp_service.yaml
Copy and paste the below manifest file into your file, save, and exit:
apiVersion: v1
kind: Service
metadata:
 name: example-prod
spec:
 selector:
   app: my-app
   env: prod
 type: ClusterIP
 ports:
 - protocol: TCP
   port: 80
   targetPort: 8080
Step 3: Deploy your Service to the cluster.
$ kubectl create -f clp_service.yaml

service/example-prod created
Step 4: Make sure both your Pods and the Service are running by checking their statuses.
Check the status of the service:
$ kubectl get service example-prod
NAME               TYPE        CLUSTER-IP    EXTERNAL-IP   PORT(S)  	AGE
example-prod       ClusterIP   10.107.61.93  <none>     80/TCP    	13s
Check the status of the Pods to get their names:
$ kubectl get pods
NAME                             READY   STATUS    RESTARTS   AGE
my-deployment-6b9b97d749-g5d2w   1/1     Running   0          10m
my-deployment-6b9b97d749-w9tq5   1/1     Running   0          10m
Step 5: Determine the Service IP and Port.
Exec into one of the containers:
$ kubectl exec -it my-deployment-6b9b97d749-g5d2w -- bin/bash

root@my-deployment-6b9b97d749-g5d2w:
Check the Service info in the Container:
root@my-deployment-97cfc859f-q9dqh:/# printenv | grep SERVICE
KUBERNETES_SERVICE_HOST=10.96.0.1

KUBERNETES_SERVICE_PORT=443

KUBERNETES_SERVICE_PORT_HTTPS=443
As can be seen above, the created Service was not part of the output. Why? This will be the case if you create the Deployment before the Service. You can simply correct it by deleting all the instances of the Pod so that they can be re-created when the Service is already running.
$ kubectl delete pod my-deployment-6b9b97d749-g5d2w my-deployment-6b9b97d749-w9tq5

pod "my-deployment-6b9b97d749-g5d2w" deleted

pod "my-deployment-6b9b97d749-w9tq5" deleted
Check the status of the Pods:
$ kubectl get pods
NAME                                READY     STATUS     RESTARTS   AGE

my-deployment-6b9b97d749-48d27      1/1       Running    0          21s

my-deployment-6b9b97d749-gsrwp      1/1       Running    0          21s
Exec into one of the Containers again:
$ kubectl exec -it my-deployment-6b9b97d749-48d27 -- bin/bash

root@my-deployment-6b9b97d749-48d27:/#
Check the Service info in the Container:
root@my-deployment-6b9b97d749-48d27:/# printenv | grep SERVICE
KUBERNETES_SERVICE_PORT_HTTPS=443 ## Default Service name and Port on the Cluster

KUBERNETES_SERVICE_PORT=443

EXAMPLE_PROD_SERVICE_HOST=10.107.61.93 ##Service IP as shown in the Service status

KUBERNETES_SERVICE_HOST=10.96.0.1 ## Kubernetes IP already on the cluster

EXAMPLE_PROD_SERVICE_PORT=80 ##Service name and Port specified in the Service YAML file.
As can be seen here, the Service name, Port, and host values are output in the container. This is possible because both the Service and the Pod are running on the same Cluster and the Service was created before the Pod/Deployment.
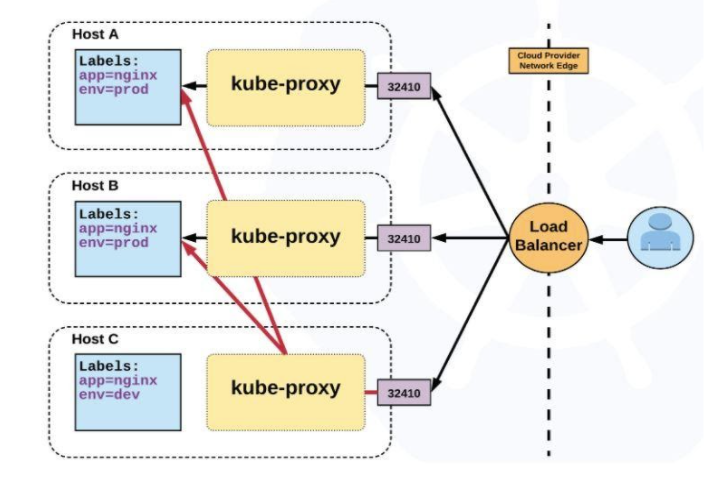
Node Port
This type of Service allows external accessibility to a Pod on a node. It receives an external request from clients or users and maps it into the Pod’s target-port and Service port. It also exposes an application externally with the help of a NodeIP and NodePort which exposes a port on every node. The NodePort range is 30000 – 32767; declaration outside this range is impossible. You can assign the NodePort manually in the manifest file or allow Kubernetes to assign it dynamically within the stipulated range.
Creating a Service with NodePort
Step1: Create a YAML file:
$ vim NP_service.yaml
Step2: Copy and paste the below manifest into your YAML file, save, and exit:
apiVersion: v1
kind: Service
metadata:
 name: example-prod
spec:
 type: NodePort
 selector:
   app: my-app
   env: prod
 ports:
 - nodePort: 32410
   protocol: TCP
   port: 80
   targetPort: 80
Step 3: Apply the manifest to the cluster.
$kubectl create -f NP_service.yaml

service/example-prod created
Step 4: Check the status of the Service with the kubectl get service command.
ExternalName
This Service type uses DNS in place of a selector and creates an internal CNAME DNS entry that aliases another. It has no port or proxying but only references the endpoints outside the cluster.
apiVersion: v1
kind: Service
metadata:
 name: example-prod
spec:
 type: ExternalName
 externalName: example.com
Headless Service
This is a Service type where cluster IP is not allocated. No load balancing or proxying is done by this Service type, instead allows direct connection to a Pod. It also displays the list of the Pod IPs when a DNS query for headless Services is run.
Creating a Headless Service
You can create a Headless Service just like any other Services but the ClusterIP property value must be set to none in the YAML manifest file. The configuration data will look like this:
apiVersion: v1
kind: Service
metadata:
 name: app
spec:
 clusterIP: None
 selector:
   app: my-app
   env: prod
 ports:
 - protocol: TCP
   port: 80
   targetPort: 80
Use kubectl create command to create the Service and kubectl get service command to check the status of the Service.
LoadBalancer Service
This Service type shares the client’s requests across the servers continuously, efficiently, and evenly to protect against the excessive usage of server resources. The future addition or reduction of servers is made easier and more flexible with this Service type. It consists of both a ClusterIP address and NodePort and also works in conjunction with an external system to map a cluster external IP to the exposed Service.
Internal and External LoadBalancer
Creating a load balancer Service can be done in two different ways, either internal or external.
The internal LoadBalancer, which only has a private IP address on its node, is used to balance request traffic from clients within the same virtual network.
The external LoadBalancer, on the other hand, has public IP addresses and it is used to balance external request traffic from clients outside the cluster.
Getting Traffic into your Cluster
You can get traffic to your cluster using an external LoadBalancer together with a cloud provider that supports the external LoadBalancer. Below, we will walk you through the steps to create an external LoadBalancer as well as getting your public IP address for testing its functionality.
Setting-up external LoadBalancers
Before we begin, make sure your Kubernetes cluster is running and kubectl command-line tool is configured to communicate with the cluster. If you do not have a running Kubernetes cluster, you can create one using KubeOne.
Step1: Create a YAML file:
$ vim LB_service.yaml
Step2: Copy and paste the below manifest into your YAML file, save, and exit:
apiVersion: v1
kind: Service
metadata:
 name: example-prod
spec:
 type: LoadBalancer
 selector:
  app: my-app
  env: prod
 ports:
 - protocol: TCP
   port: 80
   targetPort: 80
Step 3:
$ kubectl create -f LB_service.yaml

service/example-prod created
Step 4: Check the status of the Service:
$ kubectl get service example-prod
NAME          TYPE          CLUSTER-IP              EXTERNAL-IP                               PORT(S)       AGE
example-prod  LoadBalancer  10.240.19.54  afe...61723.eu-central-1.elb.amazonaws.com          80:30592/TCP  15m
Step 5: Find the created Service’s IP address:
$ kubectl describe service example-prod
Namespace:                default

Labels:                   <none>

Annotations:              <none>

Selector:                 app=my-app,env=prod

Type:                     LoadBalancer

IP:                       10.240.19.54

LoadBalancer Ingress:     xxx.xxx.xxx

Port:                     <unset>  80/TCP

TargetPort:               80/TCP

NodePort:                 <unset>  30592/TCP

Endpoints:                172.25.0.11:80,172.25.0.12:80

Session Affinity:         None

External Traffic Policy:  Cluster

Events:

   Type           Reason               Age          From                 Message

   ----           ------               ----         ----                 -------

   Normal    EnsuringLoadBalancer      21m     service-controller   Ensuring load balancer

   Normal    EnsuredLoadBalancer       20m     service-controller   Ensured load balancer
The IP address is listed in front of the LoadBalancer Ingress field marked with xx.xxx.xxx.
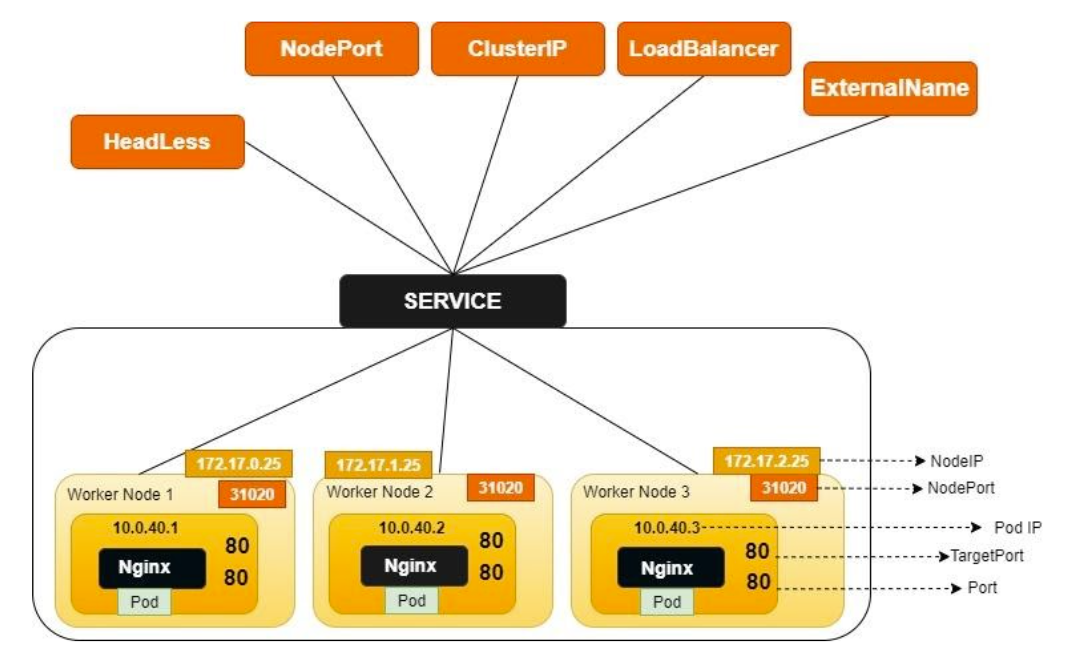
Service Types Architecture
The below image provides an overview of the Service types architecture.
Kubernetes Service is one of the essential objects in Kubernetes because of its important functionalities including communication and load balancing traffic across Pods for proper resource usage, providing a stable IP, and solving the problem of unstable Pod IP when a Pod dies or when a container in a Pod restarts.
The next parts in our series will deal with keeping application state. We will show you how to configure an application using files and environment variables, keeping your data secret (Kubernetes Secret), and how you can use a Configmap to store non-sensitive data among others.
If you have any questions or comments about Service or other Kubernetes objects, feel free to get in touch with us here.
Learn More
- Visit the official Kubernetes website for more resources on Kubernetes Service
- Learn more about using a Service to expose your app here
- Learn more about external load-balancers here

