


Today Amazon announced Amazon EKS Distro (EKS-D), a Kubernetes distribution based on and used by Amazon EKS. Amazon EKS Distro enables operators to create reliable and secure Kubernetes clusters using the same versions of Kubernetes and its dependencies deployed by Amazon EKS. As an AWS partner, we are proud that our open source cluster lifecycle management tool Kubermatic KubeOne is part of the first batch of distributions to offer out-of-the-box support for Amazon EKS Distro. Thanks to Kubermatic KubeOne’s Terraform integration and ease of use, users can install EKS Distro on AWS and Amazon Linux 2 with minimal operational effort.
In this blog post, we provide you with a step by step description of how to get started with Amazon EKS Distro on Kubermatic KubeOne.
Prerequisites
Before setting up Amazon EKS Distro, you need to install Kubermatic KubeOne v1.2.0-alpha.0 by downloading a binary from the Github releases and following the instructions in our documentation.
Moreover, make sure that you have the following prerequisites satisfied:
- Installed Terraform v0.12+ if you want to provision the infrastructure using our example Terraform configs. You can find the installation instructions in the official Terraform docs
- The AWS credentials configured. We recommend configuring environment variables by following the Configuring Credentials guide
- An SSH key and the
ssh-agentconfigured as described in the Configuring SSH document
Once you are all set with this, we can continue by creating the infrastructure where the Amazon EKS Distro cluster will be provisioned.
Create the Infrastructure
Step 1
To make it easier to get started, we provide example Terraform configs for AWS that you can use to create the infrastructure. Along with the Kubematic KubeOne binary, you can find the example directory that contains the example configs. Explore the AWS configs by navigating to the ./examples/terraform/aws directory.
Step 2
Initialize Terraform by running the init command.
terraform init
Step 3
Now, it’s time to configure the variables.
Create the terraform.tfvars file to instruct Terraform to create Amazon Linux 2 instances and to use the static workers instead of MachineDeployments.
Here is an example terraform.tfvars file:
cluster_name = "<replace-with-cluster-name>"

# Currently, machine-controller doesn’t support Amazon Linux 2, so we will
# use KubeOne Static Worker nodes. The static worker nodes are managed
# by KubeOne, Terraform, and kubeadm, and are defined by the
# static_workers_count variable below.
initial_machinedeployment_replicas = 0

# This variable doesn't have any effect, as initial_machinedeployment_replicas
# is set to 0. Instead, static worker nodes running Amazon Linux 2 will be used
# (defined by static_workers_count and os variables).
# This is required in order for validation to pass and will be fixed in
# the upcoming versions.
worker_os                          = "ubuntu"

# Number of worker nodes to be created and provisioned.
static_workers_count               = 3

# Currently, KubeOne supports EKS-D only on Amazon Linux 2.
# Support for other operating systems is planned for the future.
os                                 = "amazon_linux2"
ssh_username                       = "ec2-user"
bastion_user                       = "ec2-user"
Step 4
With the variables configured, you’re now ready to create the infrastructure by applying the configs.
You can see what changes will be made by running the plan command:
terraform plan
If you agree with the proposed changes, run the apply command to create the infrastructure. You’ll be asked to type yes to confirm your intention.
terraform apply
It takes several minutes to provision the infrastructure and for instances to come up.
Step 5
The last step regarding provisioning infrastructure is to export the Terraform state to be parsed by the Kubermatic KubeOne Terraform Integration for information about instances and worker nodes. The state file is generated using the terraform output command.
terraform output -json > tf.json
Note: For more information on the Kubermatic KubeOne Terraform integration and exporting the Terraform State please consult our documentation.
Provisioning
Creating the KubeOne Configuration Manifest
Kubermatic KubeOne declares clusters declaratively using the KubeOne Configuration Manifest. The first step in the provisioning process is to create the manifest and define the cluster that’s going to be provisioned.
Create a file called kubeone.yaml that will define the following properties:
- The desired Kubernetes version in the EKS-D format, e.g.
v1.18.9-eks-1-18-1 - The target cloud provider (in our case AWS)
- The asset configuration containing references to EKS-D images and binaries
Other information, such as information about the control plane and worker instances to be used, and information about the API server load balancer, are taken from the Terraform output generated in the previous step.
Here’s an example:
apiVersion: kubeone.io/v1beta1
kind: KubeOneCluster
versions:
  kubernetes: "<kube-apiserver-tag>"
cloudProvider:
  aws: {}
assetConfiguration:
  kubernetes:
    imageRepository: "public.ecr.aws/eks-distro/kubernetes"
  pause:
    imageRepository: "public.ecr.aws/eks-distro/kubernetes"
    imageTag: "<pause-image-tag>"
  etcd:
    imageRepository: "public.ecr.aws/eks-distro/etcd-io"
    imageTag: "<etcd-image-tag>"
  coreDNS:
    imageRepository: "public.ecr.aws/eks-distro/coredns"
    imageTag: "<coredns-image-tag>"
  metricsServer:
    imageRepository: "public.ecr.aws/eks-distro/kubernetes-sigs"
    imageTag: "<metrics-server-image-tag>"
  cni:
    url: "<cni-plugins-url>"
  nodeBinaries:
    url: "<node-binaries-url>"
  kubectl:
    url: "<kubectl-binary-url>"
Make sure to replace the placeholder values (values with <>) with the real values. You can find the real values in the EKS-D Release Manifest for the release you want to deploy.
Find the entries with the following descriptions, note the image’s tag, and replace the placeholder value in the KubeOne manifest with the image’s tag:
- “kube-apiserver container image” - replace placeholder
<kube-apiserver-tag>(example valuev1.18.9-eks-1-18-1) - “pause container image” - replace placeholder
<pause-image-tag>(example valuev1.18.9-eks-1-18-1) - “etcd container image” - replace placeholder
<etcd-image-tag>(example valuev3.4.14-eks-1-18-1) - “coredns container image” - replace placeholder
<coredns-image-tag>(example valuev1.7.0-eks-1-18-1) - “metrics-server container image” - replace placeholder
<metrics-server-image-tag>(example valuev0.4.0-eks-1-18-1)
Once done, find the entries with the following descriptions, note the artifact’s URI (from the archive.uri field), and replace the following placeholder value in the KubeOne manifest with the URI. Make sure to choose the artifact for the correct architecture (by default amd64).
- “cni-plugins tarball for linux/amd64” - replace placeholder
<cni-plugins-url>(example valuehttps://distro.eks.amazonaws.com/kubernetes-1-18/releases/1/artifacts/plugins/v0.8.7/cni-plugins-linux-amd64-v0.8.7.tar.gz) - “Kubernetes node tarball for linux/amd64” - replace placeholder
<node-binaries-url>(example valuehttps://distro.eks.amazonaws.com/kubernetes-1-18/releases/1/artifacts/kubernetes/v1.18.9/kubernetes-node-linux-amd64.tar.gz) - “kubectl binary for linux/amd64” - replace placeholder
<kubectl-binary-url>(example valuehttps://distro.eks.amazonaws.com/kubernetes-1-18/releases/1/artifacts/kubernetes/v1.18.9/bin/linux/amd64/kubectl)
Provisioning the Cluster
With the configuration manifest in place, you’re ready to provision the cluster. The cluster is provisioned by running the appropriate kubeone apply command, and providing it the configuration manifest and the exported Terraform state file.
kubeone apply --manifest kubeone.yaml -t tf.json
The apply command analyzes the given instances, verifies that there is no Kubernetes running on those instances, and offers you to provision the cluster. You’ll be asked to confirm your intention to provision the cluster by typing yes.
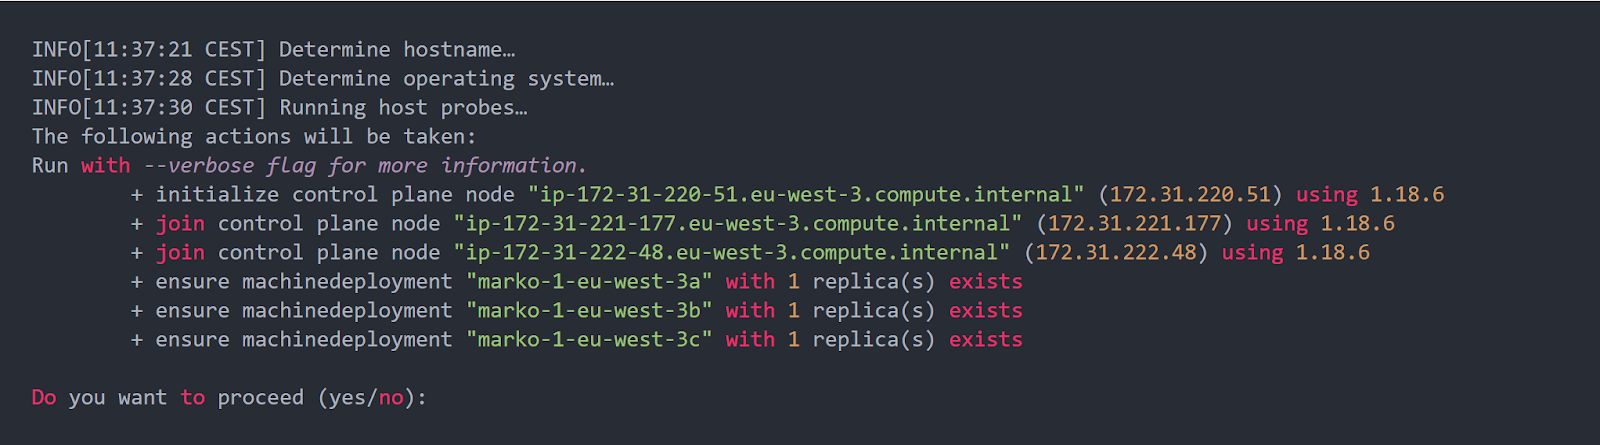
After confirming your intention to provision the cluster, the process will start. It usually takes 5-10 minutes for the cluster to be provisioned. Meanwhile, you can configure the cluster access.
Configuring the Cluster Access
Kubermatic KubeOne automatically downloads the Kubeconfig file for the cluster. It’s named as <cluster_name>-kubeconfig, where <cluster_name> is the name provided in the terraform.tfvars file. You can use it with kubectl such as:
kubectl --kubeconfig=<cluster_name>-kubeconfig
or export the KUBECONFIG environment variable:
export KUBECONFIG=$PWD/<cluster_name>-kubeconfig
You can check the Configure Access To Multiple Clusters document to learn more about managing access to your clusters.
Finally, to test if everything works properly, you can try to get nodes and verify that worker nodes joined a cluster and that all nodes are ready.
kubectl get nodes
You now should see the number of nodes defined in the terraform.tfvars file along with the control plane nodes.

That’s it - you run your first Amazon EKS Distro Cluster:) Congratulations!
What Is Next?
We are currently working on extending support to on-prem environments, bringing the advantages of EKS Distro to the data centers. Moreover, we will be adding EKS distro support for other Linux distributions (Ubuntu, CentOS, Flatcar), as well as ensuring you can use EKS Distro on all other providers that are natively supported by Kubermatic KubeOne (i.a. OpenStack, VMware vSphere). If you would like to know more about Amazon EKS Distro on Kubermatic KubeOne, feel free to contact us.
Learn More
- Find Kubermatic KubeOne on Github
- See Demo: Set up EKS-Distro With Kubermatic KubeOne
- Read AWS Announcement Post


