


Previously in this series, we looked at volumes and volumeMounts in Kubernetes. Now, we will take a step further and introduce two other Kubernetes objects related to data persistence and preservation. In this part of the series, you will learn about persistent storage in Kubernetes, specifically PersistentVolumes (PVs) and PersistentVolumeClaims (PVCs).
We will cover the following topics, including hands-on practice on the functionalities of these concepts:
- What are PersistentVolumes and PersistentVolumeClaims?
- How and by whom are PersistentVolumes defined?
- How do PersistentVolumes differ from Volumes?
- How are PersistentVolumes and PersistentVolumeClaims created?
- How and by whom is Persistent storage requested using PersistentVolumeClaims?
Kubernetes PersistentVolumes (PVs) and PersistentVolumeClaims (PVCs)
Storage management is essential in Kubernetes, especially in large environments where many users deploy multiple Pods. The users in this environment often need to configure storage for each Pod individually, and any changes to existing applications must be applied to all Pods sequentially. This process can be time-consuming. To address this issue and separate how storage is provisioned from how it is consumed, we use PersistentVolumes (PVs) and PersistentVolumeClaims (PVCs).
What are PersistentVolumes and PersistentVolumeClaims?
A PersistentVolume (PV) in Kubernetes is a pool of pre-provisioned storage resources in a Kubernetes cluster, that can be used across different user environments. Its lifecycle is separate from a Pod that uses the PersistentVolume.
A PersistentVolumeClaim (PVC), is a process of storage requests from PVs by the users in Kubernetes. Kubernetes binds PVs with the PVCs based on the request and property set on those PVs. Kubernetes searches for PVs that correspond to the PVCs’ requested capacity and specified properties, so that each PVC can bind to a single PV.
When multiple matches are found, labels and selectors can be employed to bind a PVC to the most appropriate or specific PV. This approach prevents situations where a small PVC inadvertently binds to a larger PV, as PVs and PVCs are designed to have a one-to-one relationship. If a small PVC binds to a large PV, the unused capacity of the PV becomes inaccessible to other users. By using labels and selectors, you can ensure that each PVC is matched with the most suitable PV, optimizing resource utilization and preventing wasted storage space.
NOTE: Both the PVCs and the Pod using them must be in the same namespace.
The Difference Between PersistentVolumes and PersistentVolumeClaims in Kubernetes
PersistentVolumes and PersistentVolumeClaims in Kubernetes differ in provisioning, functionalities, and the person responsible for creating them, specifically :
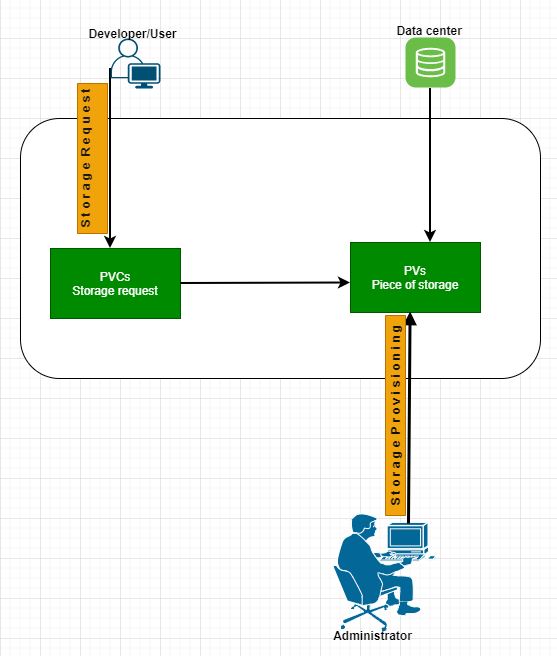
- PVs are created by the cluster administrator or dynamically by Kubernetes, whereas users/developers create PVCs.
- PVs are cluster resources provisioned by an administrator, whereas PVCs are a user’s request for storage and resources.
- PVCs consume PVs resources, but not vice versa.
- A PV is similar to a node in terms of cluster resources, while a PVC is like a Pod in the context of cluster resource consumption.
Difference Between Volumes and PersistentVolumes
Volumes and PersistentVolumes differ in the following ways:
- A Kubernetes Volume separates storage from a container but binds it to a Pod, while PVs separate storage from a Pod.
- The lifecycle of a Volume is dependent on the Pod using it, while the lifecycle of a PV is not.
- A Volume enables safe container restart and allows sharing of data across containers, whereas a PV enables safe Pod termination or restart.
- A separate manifest YAML file is needed to create a PV, but it is not required for a volume.
PersistentVolumes and PersistentVolumeClaims Lifecycle
The communication between Kubernetes PVs and PVCs consists of the following stages:
Provisioning: This is the process of creating a storage volume, which can be done statically or dynamically.
- Static: The static way of provisioning a storage volume is when PVs are created before PVCs by an Administrator and exist in the Kubernetes API, waiting to be claimed by a user’s storage request, using PVC.
- Dynamic: The dynamic way of storage provisioning involves creating PVs automatically, using StorageClass instead of manual provisioning of PersistentVolumes. Kubernetes will dynamically provision a volume specifically for this storage request, with the help of a StorageClass. (More about StorageClass and how it is used to provision Kubernetes PVs dynamically in the next part of this series).
Binding: When an Administrator has provisioned Kubernetes PVs and users make a specific amount of storage requests (PVCs), a control loop in the master finds a matching PV and binds them together. If a matching volume does not exist, the claim will remain unbound until a volume match is created.
Using: Pods use claims as volumes. The Kubernetes API checks the claim to find a bound PV and mounts it in the Pod for the users. When a claim is already bound to a PV, the bind remains unchanged as long as the user wants it. So user A’s bound PV can not be taken over by user B, if it is still in use by user A.
Reclaiming: When a user is done with the volume usage, the resources must be freed up by deleting the PVC objects from Kubernetes. This practice will free the PV from the PVC, allowing reclamation of the resources, making it available for future use. What happens to the volumes afterwards is determined by the PersistentVolumeReclaimPolicy (PVRP) value specified in the configuration file. The PVRP provides three options of what you can do to a PersistentVolume after the claim has been deleted: retain, delete, or recycle.
- Retain: This is the default reclaim policy. It is a process that allows manual deletion of the PV by the Administrator. When a PVC is deleted, the PV remains intact, including its data, thus making it unavailable for use by another claim. However, the Administrator can still manually reclaim the PersistentVolume.
- Delete: When the reclaim policy is set to delete, the PV deletes automatically when the PVC is deleted and makes the space available. It is important to note that the dynamically provisioned PVs inherit the reclaim policy of their StorageClass, which defaults to Delete.
- Recycle: This type of reclaim policy will scrub the data in the PV and make it available for another claim.
How to Create a PersistentVolume
The following steps will guide you on how to create a PersistentVolume and how to use it in a Pod. Before continuing, it is imperative to have a basic knowledge of volume, volumeMounts, and volume types such as hostPath, emptyDir, among others, in order to effectively follow this hands-on practice. A running Kubernetes cluster and a kubectl command-line tool must be configured to talk to the cluster. If you do not have this, you can simply create a Kubernetes cluster on any environment with KubeOne. Refer to Getting Started for instructions. Alternatively, you can go to the Kubernetes playground to practice. In that case, you might also need a cloud provider (GKE, AWS, etc.) access or credentials to provision storage.
Follow the below steps to create a PersistentVolume (PV):
Step 1: Create the YAML file.
$ vim pv-config.yaml
Step 2: Copy and paste the below configuration file into the YAML manifest file created above.
apiVersion: v1
kind: PersistentVolume
metadata:
  name: my-volume
spec:
  capacity:
    storage: 3Gi
  accessModes:
    - ReadWriteOnce
  hostPath:
    path: "/app/data"
The configuration above shows properties with different functionalities. In addition to the properties from the previous Kubernetes objects exercises, let’s look at accessModes, capacity, and storage properties:
accessModes: This property defines how a PV should be mounted on the host. The value can be ReadWriteOnce, ReadOnlyMany, or ReadWriteMany. Below is a basic description of these values:
- ReadWriteOnce: You can mount the PV as read-write by a single node.
- ReadOnlyMany: You can mount the PV as read-only by multiple nodes.
- ReadWriteMany: You can mount the PV as read-write by multiple nodes.
capacity.storage: This property is used to set the amount of storage needed for the volume.
Step 3: Create the Persistent Volume using kubectl create command.
$ kubectl create -f pv-config.yaml
persistentvolume/my-volume created
Step 4: Check the created PV to see if it is available.
$ kubectl get pv

NAME       CAPACITY   ACCESS MODES   RECLAIM POLICY  STATUS     CLAIM    STORAGECLASS      REASON      AGE
my-volume    3Gi       RWO              Retain       Available                         ⠀⠀⠀⠀⠀⠀⠀⠀⠀⠀⠀⠀⠀ 60s
Step 5: Check the description of the PersistentVolume by running kubectl describe command.
$ kubectl describe pv my-volume

Labels:          <none>
Annotations:     <none>
Finalizers:      [kubernetes.io/pv-protection]
StorageClass:
Status:          Available
Claim:
Reclaim Policy:  Retain
Access Modes:    RWO
VolumeMode:      Filesystem
Capacity:        3Gi
Node Affinity:   <none>
Message:
Source:
    Type:          HostPath (bare host directory volume)
    Path:          /app/data
    HostPathType:
Events:            <none>
As seen above, the PersistentVolume is available and ready to serve a PVC storage request. The status will change from available to bound when it has been claimed.
NOTE: It is not advisable to use the hostpath volume type in a production environment.
How to Create a PersistentVolumeClaim (PVC) in Kubernetes
Now that the PersistentVolume has been successfully created, the next step is to create a PVC that will claim the volume. Creating a PersistentVolumeClaim is similar to the method used to create the PersistentVolume above, with a few differences in terms of its properties and values. The value of the kind property will be PersistentVolumeClaim. The resources.request.storage field will also be added, and the value will be the provisioned PV capacity value (so 3Gi in our case).
The following steps will guide you on how to create a PersistentVolumeClaim (PVC) in Kubernetes:
Your configuration will look like the manifest file below:
apiVersion: v1
kind: PersistentVolumeClaim
metadata:
  name: my-claim
spec:
  accessModes:
    - ReadWriteOnce
   resources:
      requests:
        storage: 3Gi
Step 1: Create a YAML file.
$ vim pvc-config.yaml
Step 2: Copy and paste the above configuration file into the YAML file created above.
Step 3: Create the PVC by running kubectl create command.
$ kubectl create -f pvc-config.yaml
persistentvolumeclaim/my-claim created
Step 4: Check the status of the PVC by running kubectl get command.
$ kubectl get pvc my-claim

NAME       STATUS     VOLUME      CAPACITY   ACCESS MODES   STORAGECLASS   AGE
my-claim   Bound    my-volume       3Gi           RWO                      7m
Step 5: Check the description of the PVC.
$ kubectl describe pvc my-claim

Name:          my-claim
Namespace:     default
StorageClass:
Status:        Bound
Volume:        my-volume
Labels:        <none>
Annotations:   pv.kubernetes.io/bind-completed: yes
               pv.kubernetes.io/bound-by-controller: yes
Finalizers:    [kubernetes.io/pvc-protection]
Capacity:      3Gi
Access Modes:  RWO
VolumeMode:    Filesystem
Mounted By:    <none>
Events:        <none>
As shown above, the status indicates a “Bound” state, which means the PVC and PV are now bound together. Now, check the status of the PV once again with kubectl get command.
$ kubectl get pv my-volume

NAME       CAPACITY   ACCESS MODES   RECLAIM POLICY  STATUS     CLAIM        ⠀⠀⠀STORAGECLASS    REASON     AGE
my-volume    3Gi       RWO              Retain       Bound   default/my-claim                          ⠀⠀⠀ 11m
The output shows that the status has changed from “available” when it is not yet bound to “Bound” because the PV has been claimed by the created PVC.
Step 6: Delete the PVC using kubectl delete command.
$ kubectl delete pvc my-claim

persistentvolumeclaim "my-claim" deleted
Step 7: Check both the PVC and PV status with kubectl get command.
$ kubectl get pvc my-claim

No resources found in default namespace.
$ kubectl get pv my-volume

NAME       CAPACITY   ACCESS MODES   RECLAIM POLICY  STATUS       CLAIM        ⠀⠀⠀STORAGECLASS    REASON     AGE
my-volume    3Gi       RWO              Retain       Released   default/my-claim                          ⠀⠀ 21m
The output shows that the Kubernetes PV status has now changed from a “Bound” to a “Released” state, after the PVC is deleted.
PersistentVolumes States
A PV has different states, can be in any of these, and each has its own meaning, described as follows:
- Available: The PV is free and not yet claimed or bounded.
- Bound: The PV has been claimed or bounded.
- Released: The bounded PVC has been deleted, and the PV is free from its previous bounded state.
- Failed: The PV has failed its automatic reclamation.
PersistentVolumeClaims States
Each PVC, like the PV, has its own states that represent its current status.
- Bound: The PVC is bound to a PV.
- Pending: The PVC can not bind to a PV. This could be due to a higher storage request than the PV capacity, or the PV accessMode value is different from that of the PVC, etc.
How to Use PersistentVolumeClaim in a Pod
A Pod can access storage with the help of a PVC, which will be used as a volume. PVC can be used in a Pod by first declaring a “volumes” property in the Pod manifest file and specifying the claim name under the declared volume type “persistentVolumeClaim” property. It is essential that both the PVC and the Pod using it exist in the same namespace. This will allow the cluster to find the claim in the Pod’s namespace and use it to access the PersistentVolume that is bound to the PVC. Once created, the applications in the containers can read and write into the storage.The complete configuration file will look like this:
apiVersion: v1
kind: Pod
metadata:
  name: my-pod
spec:
  containers:
  - name: stclass-test
    image: nginx
    volumeMounts:
    - mountPath: "/app/data"
      name: my-volume
  volumes:
  - name: my-volume
    persistentVolumeClaim:
      claimName: my-claim
The below steps will guide you through how to use a claim in a Pod. The PV and PVC have to be provisioned before creating the Pod. The claim name inside the Pod must also match the claim name in the running PVC.
Step 1: Create a YAML file.
$ vim pvc-pod.yaml
Step 2: Copy and paste the above Pod manifest file into the YAML file created above and create the Pod with kubectl create command.
$ kubectl create -f pvc-pod.yaml

pod/my-pod created
Step 3: Check the status and the description of the Pod.
$ kubectl get pod my-pod

NAME      READY   STATUS    RESTARTS    AGE
my-pod     1/1    Running      0       6m50s
$ kubectl describe pod my-pod

Name:         my-pod
Namespace:    default
Priority:     0
Node:         node01/172.17.0.57
Start Time:   Tue, 01 Dec 2020 11:44:08 +0000
Labels:       <none>
Annotations:  <none>
Status:       Running
IP:           10.244.1.2
IPs:
  IP:  10.244.1.2
Volumes:
  my-volume:
    Type:       PersistentVolumeClaim (a reference to a PersistentVolumeClaim in the same namespace)
    ClaimName:  my-claim
    ReadOnly:   false
  default-token-nlmxj:
    Type:       Secret (a volume populated by a Secret)
    SecretName: default-token-nlmxj
    Optional:   false
QoS Class:      BestEffort
Step 4: Exec into the Pod to test the PVC use case.
$ kubectl exec -it my-pod -- bin/bash

root@my-pod:/#
Step 5: Use df -h together with the path to confirm the mount point.
root@my-pod:/# df -h /app/data

Filesystem                   		Size  	 Used 	    Avail       Use% Mountedon
/dev/mapper/host01--vg-root  	        191G      22G        159G        13% /app/data
Step 6: Change into the mount directory and create a file using echo command.
root@my-pod:/# cd /app/data
root@my-pod:/app/data# echo "I love Kubermatic" > file.txt
Step 7: Check the created file and data using ls and cat commands, then exit the Pod once this has been confirmed.
root@my-pod:/app/data# ls
file.txt
root@my-pod:/app/data# cat file.txt
"I love Kubermatic"
root@my-pod:/app/data# exit
Step 8: Delete and recreate the Pod.
$ kubectl delete pod my-pod
pod "my-pod" deleted
$ kubectl get pods

No resources found in default namespace.
Recreate the Pod and check the status:
$ kubectl create -f pvc-pod.yaml
pod/my-pod created

$ kubectl get pod my-pod

NAME     READY     STATUS    RESTARTS   AGE
my-pod    1/1      Running     0         5s
Step 9: Exec into the Pod and check the previous file and data created if they exist in the new Pod.
$ kubectl exec -it my-pod -- bin/bash
root@my-pod:/# df -h /app/data

Filesystem                     Size    Used    Avail    Use%   Mountedon
/dev/mapper/host01--vg-root    191G     22G    159G     13%    /app/data

root@my-pod:/# cd /app/data
root@my-pod:/app/data# ls
file.txt
root@my-pod:/app/data# cat file.txt
"I love Kubermatic"
You can see that the file and data created in the deleted Pod above are still there and were taken up by the new Pod.
Summary: PersistentVolumes and PersistentVolumeClaims are Kubernetes objects that work in tandem to give your Kubernetes applications a higher level of persistence, either statically or dynamically, with the help of StorageClass. In this part of the series, you learned how to create PersistentVolumes and PersistentVolumeClaims, how they are defined, and how PersistentVolumes differ from Volumes.
In the next part of our series, we will look at another way to persist data in Kubernetes with StorageClass. You’ll see its functionalities in action, why it’s needed, and how it can be used in a Pod together with a claim.
We’d love to hear from you! Please contact us with any thoughts or questions you might have about PersistentVolumes and PersistentVolumeClaims.
Learn More
- Learn more about Kubernetes Persistent Volumes and Kubernetes Persistent Volume Claim.
- Read more on how to bind PersistentVolumes.
- Watch Philipp Reisner’s talk on Persistent Volumes for Kubernetes.

